Electron
Introduction
“Electron is a framework that enables you to create desktop applications with JavaScript, HTML, and CSS.” - https://www.electronjs.org/docs/tutorial/quick-start
Electron requires nodejs and npm on your target to run.
This article will introduce you to run Electron on one of our Modules.
Demo Video
Precompiled Images
Note
There are precompiled images, including our Electron Demo, available.
If you want to start developing yourself, just continue reading this guide.
Module |
Precompiled Demo Image |
Flashtools |
|---|---|---|
QSMP-1570 |
||
TX8M-1610 |
tx8m-1610-electron-demo.zip - Download Area |
Debian Setup
Install the required packages
Refer to our Debian 12 guide
apt update
apt install -y nodejs npm
apt install -y libnss3 libatk1.0-0 libatk-bridge2.0-0 libgtk-3-0 libasound2
npm install --save-dev electron
Option 1: X11
apt install -y xserver-xorg xinit
export DISPLAY=:0
xinit &
Option 2: Weston
apt install -y weston
export XDG_RUNTIME_DIR=/run/user/0
export WAYLAND_DISPLAY=wayland-1
weston --backend=drm-backend.so --tty=1 --continue-without-input &
Electron needs to be be started with option --ozone-platform=wayland. See Electron Demo, package.json
"start": "electron main.js --no-sandbox --ozone-platform=wayland",
"test": "electron --inspect --remote-debugging-port=9223 main.js --no-sandbox --ozone-platform=wayland"
Yocto Setup
For creating the neccessary RootFS, a complete Yocto build environment is required.
Depending on your module choose the correct guide - if not already set up.
Note
QSXP, QSXM, QS8M, TX8M, TX8P use NXP Yocto BSP Guide
Note
QSMP, TXMP, TX6, TXUL use Mainline Yocto BSP Guide
Setup the Yocto build-directory as described in the Yocto guide for your machine. Use the following values:
DISTRO=karo-xwaylandMACHINE=<desired-machine>
Append your
conf/local.confas follows.
TX6, TXUL, QSMP, TXMP |
QS8M, QSXM, QSXP, TX8 |
|---|---|
IMAGE_INSTALL:append = " \
    git \
    nodejs \
    nodejs-npm \
    cups \
    libxscrnsaver \
    nss \
"
|
IMAGE_INSTALL:append = " \
    git \
    nodejs \
    nodejs-npm \
    cups \
    libxscrnsaver \
    at-spi2-atk \
    libxcomposite \
    libxrandr \
    nss \
"

IMAGE_ROOTFS_EXTRA_SPACE = "1048576"
|
Compile the image.
bitbake karo-image-weston
If the build fails due to memory limits.
A main memory size of 4 GB per core should be sufficient. If you experience problems, you can also reduce the number of parallel builds using BB_NUMBER_THREADS
Program your board using our manufacturing tools. You can also boot the image from net/tftp.
Note
QSXP, QSXM, QS8M, TX8M, TX8P use UUU - Universal Update Utility
Note
QSMP, TXMP use STM32CubeProgrammer
Note
TX6, TXUL use Mfgtool
Applies only to a TXRZ or QSRZ in use with a Yocto built image
Add PAN_MESA_DEBUG=”noafbc” in /etc/environment or export PAN_MESA_DEBUG=”noafbc”
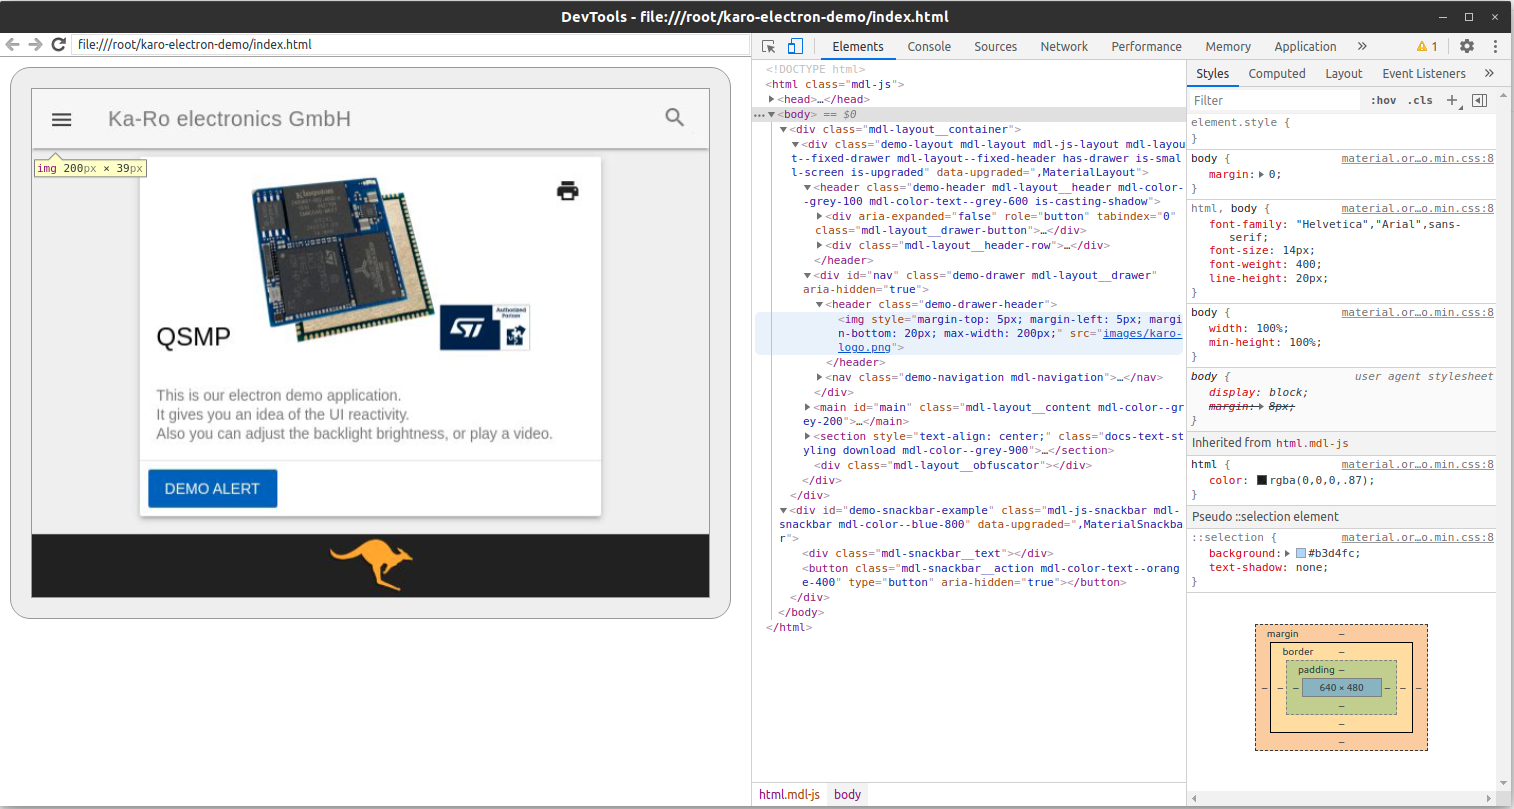
Start Demo Application
Note
The Demo was written for a 640x480 screen.
Depending on the display you use, it could be, that backlight adjustment is not working.
Module Prequisites |
Host Prequisites |
|---|---|
Network with Internet access connected |
Network connection to Module |
Display connected |
Chrome Web Browser |
SSH accessible |
SSH Client |
Boot the target, and log-in using SSH or Serial Terminal connection.
Check out our Demo application by cloning it from GitHub.
Module |
Branch Name |
|---|---|
TX6, TXUL |
|
TXMP, QSMP |
|
TX8M, TX8P |
|
QSXP, QSXM, QS8M |
|
git clone https://github.com/karo-electronics/electron-demo.git -b <branch>
Tip
If you’re receiving any SSL/certificate errors make sure your module has set the correct time.
ntpdate -s -u <ntp-server>
Into the electron-demo folder install the npm dependencies.
cd electron-demo
npm install
Set the display variable and start the application.
export DISPLAY=:0
npm start
Remote Debugging
In the package.json file of the demo application there are two scripts specified.
"scripts": {
    "start": "electron main.js --no-sandbox",
    "test": "electron --inspect --remote-debugging-port=9223 main.js --no-sandbox"
},
Hint
For TX6 Modules you have to add the extra flag --use-gl=egl to get GPU acceleration.
For remote debugging we will run the test script.
export DISPLAY=:0
npm test
On our host we now have to open two SSH tunnels.
ssh -L 9222:localhost:9223 root@<module-ip>
ssh -L 9221:localhost:9229 root@<module-ip>
When the application is started the debug ports should be forwarded to your host.
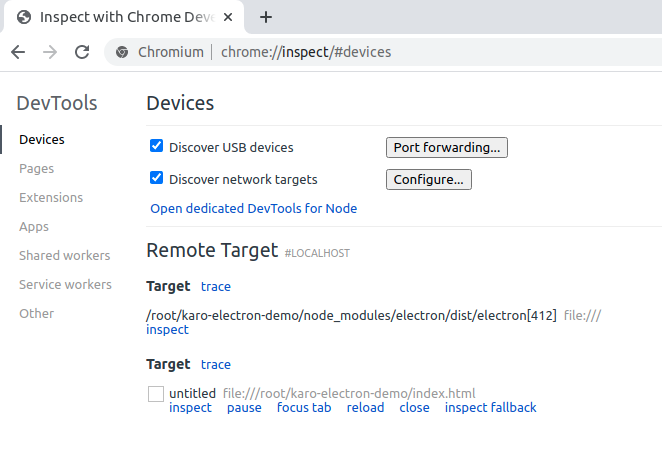
Next open Chrome and goto: chrome://inspect
Press Configure... and configure like shown below.

Then the nodejs main process and the frontend should both appear and you’re able to inspect/debug each of them.
After clicking inspect you’re able to remote control the application and debug the frontend.